In this article series, we’re going to build a full-stack demo app to explore some of the advantages of building a GraphQL API in a Node.js back-end using TypeScript. We’ll also learn how to integrate it with a client that uses React front-end to show the flexibility and scalability of this architecture.
Table Of Contents
Key Benefits of Using this Full-stack Architecture
This architecture will help us to:
What this Full-stack Project Will Cover
在本系列教程中,我们将介绍以下部分:
- 第一部分:在本系列的第一部分中,我们将概述我们将要构建的演示项目,设置本地环境,对数据进行建模并开始测试。
- 第二部分:在第二部分中,我们将深入研究GraphQL的一些核心方面,并实现/测试我们项目的后端功能。
- 第三部分:在第三部分中,我们将连接前端客户端并将其与后端集成。
Full-stack Development Tools We’ll Use
Here are the tools that we are going to use:
Project Overview: Building a Full-stack App
对于这个演示项目,我们将构建一个简单的产品目录和库存管理应用程序的基础,涵盖后端和前端工作。
以下是项目的结构:
- 后端:我们将使用Node.js构建后端,并使用TypeScript来确保类型安全。我们的API将使用Express和PostGraphile,我们将使用TypeORM作为我们的ORM工具,使其更容易与PostgreSQL数据库交互。
- 前端:我们将使用React构建前端,并使用Apollo GraphQL客户端与后端通信。我们还将使用GraphQL Codegen从GraphQL模式生成类型。
- 全栈项目功能
以下是我们希望在应用程序中包含的功能概述:
项目目标
我们的目标是建立一个强大而现代的全栈架构的基础,该架构利用GraphQL来促进客户端和服务器通信,并使用TypeScript来实现类型安全性和可维护性。
事不宜迟,让我们开始吧!
Project Setup
Let’s start by installing the initial dependencies in our project. For the sake of simplicity, we’ll assume that you can either install these dependencies or already have them installed.
Bootstrapping Our Code
First, create a folder in the project’s root directory. Then, let’s initialize the project with the following command:
npm init -y
Next, let’s install TypeScript:
npm install --save-dev typescript@^4.7.4
Let’s also create a TypeScript configuration file by creating a new file called tsconfig.json in the root directory and updating it with the following content:
{
   "compilerOptions": {
     "target": "es2018",
     "lib": ["es2018"],
     "emitDecoratorMetadata": true,
     "experimentalDecorators": true,
     "module": "commonjs",
     "rootDir": "src",
     "resolveJsonModule": true,
     "allowJs": true,
     "outDir": "build",
     "esModuleInterop": true,
     "forceConsistentCasingInFileNames": true,
     "strict": true,
     "strictPropertyInitialization": false,
     "noImplicitAny": true,
     "skipLibCheck": true
   }
 }
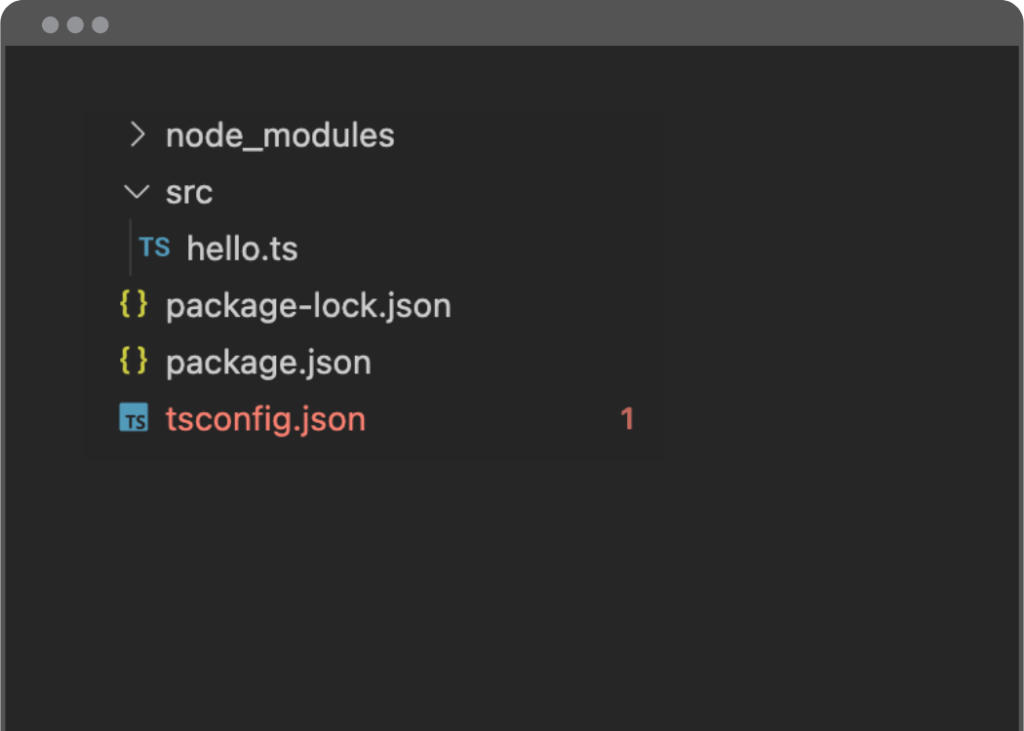
To check if TypeScript is working as expected, we’ll create a /src directory in the root folder of the project and add a new file called hello.ts, containing a simple console.log statement:
console.log('Hello world!')
Now, you should have a file structure that looks like this:

Let’s try executing this file by running the following command from the root folder:
node src/hello.ts
You should see a ‘Hello World!’ message from the terminal. You can delete the hello.ts file after.
Installing the Remaining Back-End Dependencies
In the root folder, let’s run these statements to install the dependencies for our back-end:
npm install express@^4.18.1 typeorm@^0.3.6 reflect-metadata@^0.1.13 pg@^8.7.3
npm install -save-dev @types/express@^4.17.13 @types/node@^17.0.42 ts-node-dev@^2.0.0
In order to establish a connection to our PostgreSQL database, we need to create a file in the /src folder called data-source.ts with the following content:
import "reflect-metadata"
import { DataSource } from "typeorm"

export const AppDataSource = new DataSource({
   type: "postgres",
   host: "localhost",
   port: 5432,
   username: *** INSERT YOUR POSTGRESQL USER HERE ***,
   password: *** INSERT YOUR USER PASSWORD HERE ***,
   database: "catalog_db",
   synchronize: true,
   logging: true,
   entities: [
       "src/entity/**/*.ts"
   ],
   migrations: [],
   subscribers: [],
})
Please note that some settings in this file might be different (like host & port) depending on your local environment. Also, you’ll need to set the username and password properties based on your username and password to successfully establish a connection. Make sure to provide these values before moving to the next step. The default name of our database is going to be “catalog_db“.
In order to create the database, open the terminal and run the psql utility from PostgreSQL. Inside, run the following command:
create database catalog_db;
In the same /src folder, create the following files:
index.ts:
import { AppDataSource } from "./data-source"
import App from './App'

// This is going to be our default local port for our backend. Feel free to change it.
const PORT = 8090

// Initializes the Datasource for TypeORM
AppDataSource.initialize().then(async () => {
 // Express setup
 const app = App()
  app.listen(PORT, () => {
   console.log(`Server running on port ${PORT}`)
 })
}).catch((err) => {
 console.error(err.stack)
})
And App.ts:
import express from 'express'

/**
* This is our main entry point of our Express server.
* All the routes in our API are going to be here.
**/
const App = () => {
 const app = express()
 app.use(express.json())

 app.get('/api/v1/hello', async (req, res, next) => {
   res.send('success')
 })
  return app
}

export default App
Let’s update our package.json to include the following start script in the “scripts” section:
 "scripts": {
   "start": "ts-node-dev --transpile-only src/index.ts",
   "test": "echo \"Error: no test specified\" && exit 1"
 },
We can check to see if things are working as expected by running our newly created start script.
npm run start
You should see a message saying “Server running on port 8090”. You should also see SQL output in the terminal displayed as we set the logging property in the data-source.ts to be true. This is TypeORM showing what’s happening under the hood!
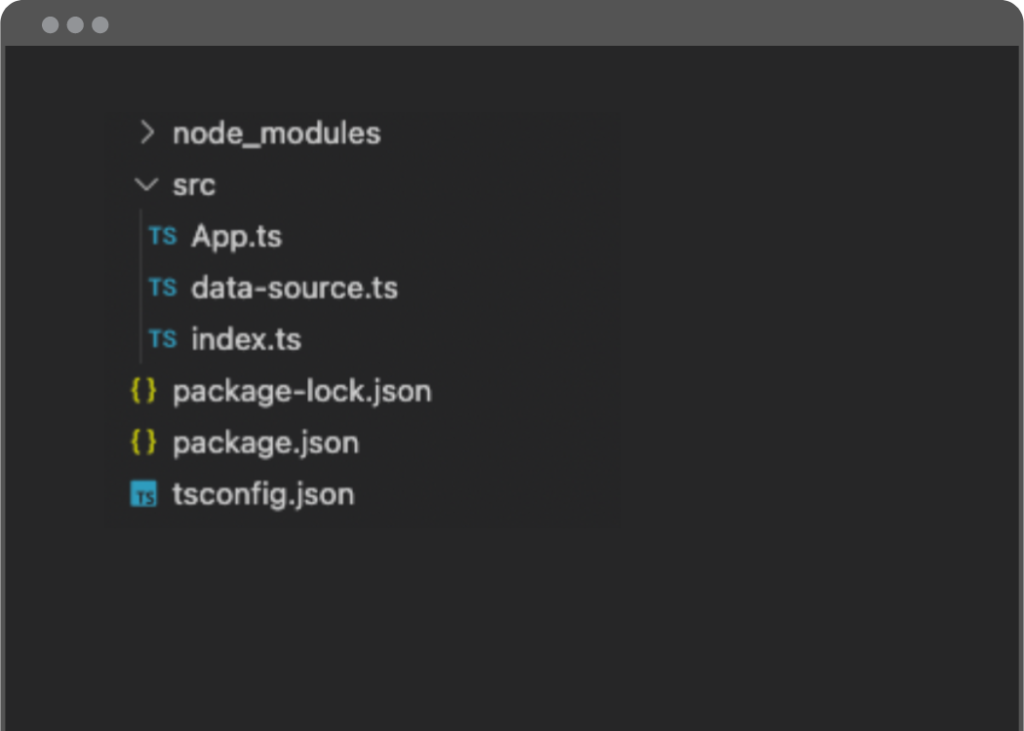
At this point, our project structure should look like this:

Let’s also ping our API to ensure it is working as expected. Run the following command in a new terminal window while the server is running:
curl --location --request GET 'localhost:8090/api/v1/hello'
If you have received a “success” message, congratulations! Our initial setup is now completed!
Next Step: Data Modeling Process
Now let’s take a look at the data model of our sample app. Since we don’t have a database structure we’re going to build a new one. We could start the schema design in PostgreSQL with SQL, but we’re going use TypeORM to make this process easier instead.
The advantage of using an ORM is that we can define our entities in an Object-Oriented (OOP) fashion and let the ORM tool take care of the relational aspect of our database schema. Our project already has this capability through the synchronize property in the data-source.ts file.
Note: for a production-ready application, we should be changing the synchronize property in the data-source.ts file to false and use the concept of DB migrations instead which is supported by TypeORM out of the box.
Mapping Entities & Relationships With TypeORM
We’ll start the schema design with the core construct of our app: the Product entity.
First, let’s create a new folder in our project directory called /src/entity, where we’ll define all the entities. Inside that folder, create a file called Product.ts and add the following:
import { Entity, Column, PrimaryGeneratedColumn } from 'typeorm'

@Entity()
export class Product {
   @PrimaryGeneratedColumn()
   id: number

   @Column()
   sku: string

   @Column()
   description: string

}
Here, we’re describing the properties of our Product entity and this will be translated into a database table by TypeORM.
If the app isn’t running, start it again by running npm run start, and you should see this section somewhere in the output:
CREATE TABLE "product" ("id" SERIAL NOT NULL, "sku" character varying NOT NULL, "description" character varying NOT NULL, CONSTRAINT "PK_bebc9158e480b949565b4dc7a82" PRIMARY KEY ("id"))
Now, if you were to take a look at the catalog_db database using a GUI app like pgAdmin, you’d see our newly created table in there!
Let’s update the Product.ts file.
import { Entity, Column, PrimaryGeneratedColumn, ManyToOne } from 'typeorm'
import { Category } from './Category'
import { Subcategory } from './Subcategory'
import { Uom } from './Uom'

@Entity()
export class Product {
  @PrimaryGeneratedColumn()
  id: number

  @Column()
  sku: string

  @Column()
  description: string

  // Product has one Category
  @ManyToOne(() => Category, category => category.products, { nullable: false })
  category: Category

  // Product can have one Subcategory
  @ManyToOne(() => Subcategory, subcategory => subcategory.products, { nullable: true })
  subcategory: Subcategory

  // Product has one UOM
  @ManyToOne(() => Uom, uom => uom.products, { nullable: false })
  uom: Uom
}
We have added references to a bunch of new entities in this file. You’ll see errors come up since these entities are not yet created.
It’s important to note how the relationship between entities is defined through the JS decorators (ex: @ManyToOne, @OneToMany) – you can find more information about that here.
Now we need to define the other entities that are currently missing. Remember that all these files should be created in the /src/entity directory:
Category.ts
import { Entity, Column, PrimaryGeneratedColumn, OneToMany } from 'typeorm'
import { Product } from './Product'
import { Subcategory } from './Subcategory'
@Entity()
export class Category {
@PrimaryGeneratedColumn()
id: number
@Column()
description: string
// Category has many products
@OneToMany(() => Product, product => product.category)
products: Product[];
// Category has many subcategories
@OneToMany(() => Subcategory, subcategory => subcategory.category)
subcategories: Subcategory[];
}
Subcategory.ts
import { Entity, Column, PrimaryGeneratedColumn, OneToMany, ManyToOne } from 'typeorm'
import { Product } from './Product'
import { Category } from './Category'

@Entity()
export class Subcategory {
  @PrimaryGeneratedColumn()
  id: number

  @Column()
  description: string

  // Subcategory has many products
  @OneToMany(() => Product, product => product.subcategory)
  products: Product[];

  // Subcategory has one Category
  @ManyToOne(() => Category, category => category.products, { nullable: false })
  category: Category

}
Supplier.ts
import { Entity, Column, PrimaryGeneratedColumn } from 'typeorm'

@Entity()
export class Supplier {
  @PrimaryGeneratedColumn()
  id: number

  @Column()
  name: string

  @Column()
  address: string

}
Uom.ts
import { Entity, Column, PrimaryGeneratedColumn, OneToMany } from 'typeorm'
import { Product } from './Product'

@Entity()
export class Uom {
  @PrimaryGeneratedColumn()
  id: number

  @Column()
  name: string

  @Column()
  abbrev: string

  // Uom has many products
  @OneToMany(() => Product, product => product.uom)
  products: Product[];

}
Warehouse.ts
import { Entity, Column, PrimaryGeneratedColumn } from 'typeorm'

@Entity()
export class Warehouse {
  @PrimaryGeneratedColumn()
  id: number

  @Column({ nullable: false })
  name: string

}
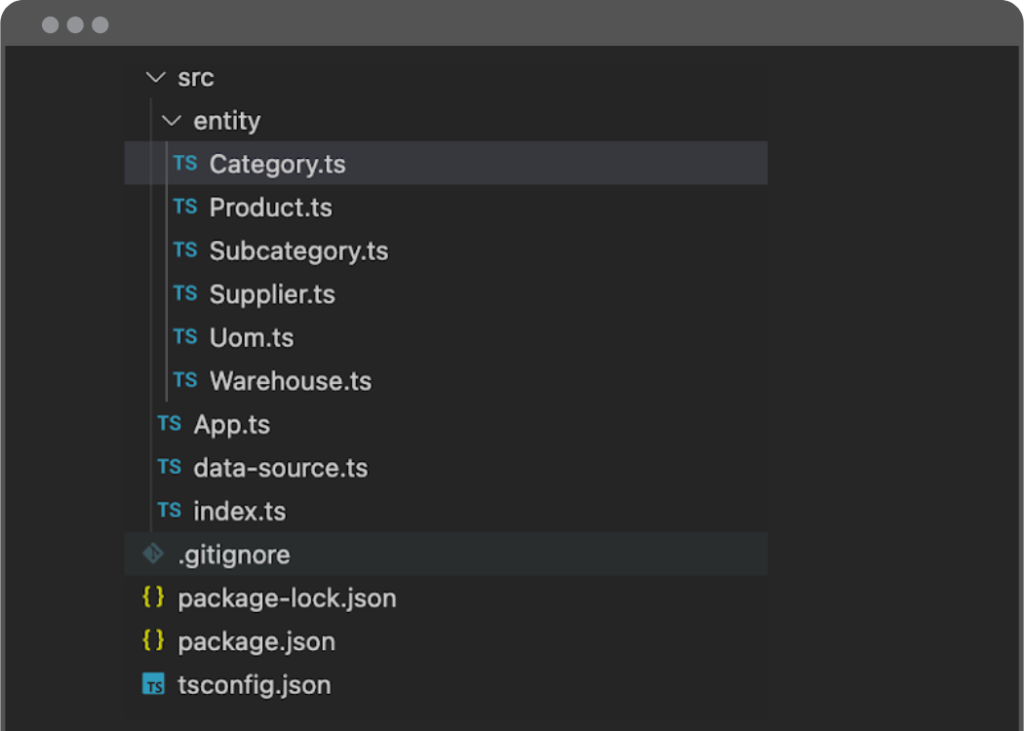
And here’s what our project structure should look like right now:

We’re going to add more entities as we implement new features. Let’s wire up some tests now!
Testing Data Creation and Storage
Let’s test if we can create and store data related to these entities in our database using the ORM capabilities. First, let’s start adding an endpoint for those tests in App.ts:
 app.post('/api/v1/test/data', async (req, res, next) => {
    /** @TODO logic to be added */
    res.send('data seeding completed!')
  })
Next, we need to implement the testing logic inside the testing endpoint using TypeORM to populate the database with seed data. The code should look like this:
App.ts
import express from 'express'
import { AppDataSource } from './data-source'
import { Product } from './entity/Product'
import { Category } from './entity/Category'
import { Subcategory } from './entity/Subcategory'
import { Supplier } from './entity/Supplier'
import { Uom } from './entity/Uom'
import { Warehouse } from './entity/Warehouse'

/**
 * This is our main entry point of our Express server.
 * All the routes in our API are going to be here.
 **/
const App = () => {
  const app = express()
  app.use(express.json())

  app.get('/api/v1/hello', async (req, res, next) => {
    res.send('success')
  })

  app.post('/api/v1/test/data', async (req, res, next) => {
    // UOM
    const each = new Uom()
    each.name = 'Each'
    each.abbrev = 'EA'
    await AppDataSource.manager.save(each)

    // Category
    const clothing = new Category()
    clothing.description = 'Clothing'
    await AppDataSource.manager.save(clothing)

    // Subcategories
    const tShirts = new Subcategory()
    tShirts.category = clothing
    tShirts.description = 'T-Shirts'

    const coat = new Subcategory()
    coat.category = clothing
    coat.description = 'Coat'
    await AppDataSource.manager.save([tShirts, coat])

    // Supplier
    const damageInc = new Supplier()
    damageInc.name = 'Damage Inc.'
    damageInc.address = '221B Baker St'
    await AppDataSource.manager.save(damageInc)

    // Warehouse
    const dc = new Warehouse()
    dc.name = 'DC'
    await AppDataSource.manager.save(dc)

    // Product
    const p1 = new Product()
    p1.category = clothing
    p1.description = 'Daily Black T-Shirt'
    p1.sku = 'ABC123'
    p1.subcategory = tShirts
    p1.uom = each

    const p2 = new Product()
    p2.category = clothing
    p2.description = 'Beautiful Coat'
    p2.sku = 'ZYX987'
    p2.subcategory = coat
    p2.uom = each

    // Note: this product intentionally does not have a subcategory
    // (it's configured to be nullable: true).
    const p3 = new Product()
    p3.category = clothing
    p3.description = 'White Glove'
    p3.sku = 'WG1234'
    p3.uom = each
    await AppDataSource.manager.save([p1, p2, p3])

    res.send('data seeding completed!')
  })

  return app
}

export default App
Start the server by running npm run start if it’s not already running. Open a new terminal to test our recently created testing endpoint by running the command below:
curl --location --request POST 'localhost:8090/api/v1/test/data'
You should see a “data seeding complete!” message after executing this command. Inspect the database to see the data that was created by calling this test endpoint.
Wrap-up of Full-stack Project – Part 1
We’ve now gone through the setup steps and discussed the core entities that are going to be a part of this sample application. The groundwork for our data model and back-end structure is complete.
Check out part two of this series, where we explore some of the key features of GraphQL and start wiring our back-end API!
- 登录 发表评论